Unfortunately I did not have the time to thorougly test it, so before you jump in and start using it on 100 page long websites, at least make a backup of your files.
If you would like to run Html Assistant in one click, make sure you edit your path and icon inside Html Assitant.desktop file (use absolute path)
ex.
Path=/path/to/your/location/
Icon=/path/to/your/location/icons/HAIcon.png
1. Installation
Most of the guides, tend to forget about the newbies, that do not know what to do with source files obtained from Github, so I will try to describe everything in detail.
First you need to download files, click on the button below to get the latest release of Html Assistant. After you extracted the files you should have six items in the folder:
- Html-Assistant.py
- assistant.glade
- style.css
- config.json
- Html-Assistant.desktop
- icons (folder)
Next follow the instruction below (1.1 or 1.2), according to your operating system.
- Html-Assistant.py - contains all python code
- assistant.glade - defines user interface
- style.css - changes style of the user interface
- config.json - it's like a database for Html Assistant. It contains templates, latest used project path, etc...
- html-assistant.desktop - one click launcher for Html Assistant. If you specified Path and Icon correctly, it should run Html Assitant in with one click.
- icons - folder which contains icons for Html Assistant
1.1 Linux:
Html Assistant was built with Python3 and Gtk+ 3. If you are using Linux, you can consider yourself lucky, since they are installed by default, so you can skip to section 2.
1.2 Mac & Windows:
In order to use Html Assistant you need Python3 and Gtk+ 3 installed. Check their websites for installation guides.
2. Usage
- First we Run Html Assistant, I prefer to run it via command line.
I cd to the right directory (where Html Assistant is located) and type
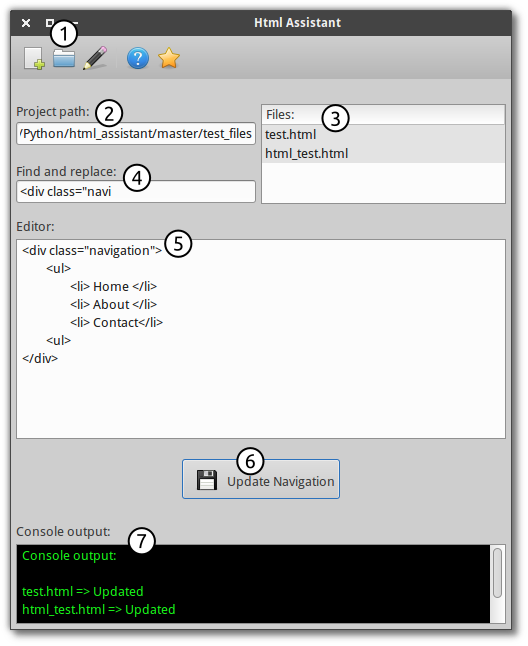
python3 main.py. - Click on the Open Project button [number 1 on picture] to select folder which contains .html files.
- Path is automatically added to the textbox [number 2 on picture]. Files from the specified project (folder) are automatically added into list view [number 3 on picture].
- Specify the element you would like to replace [number 4
on picture]. For example you would like to replace the
following div:
so we type in the text field [number 4 on picture]<div class="navigation">
<ul>
<li> First link </li>
<li> Second link </li>
</ul>
</div><div class="navigation - Write or paste new navigation in the editor window
[number 5 on picture] for example:
<div class="new_navigation">

    <ul>

        <li> Home </li>

        <li> About </li>

        <li> Contact </li>

    </ul>

</div>
Make sure that you write whole navigation not just the inside part (ul & li). Html Assistant rewrites the entire part of the page specified in [number 4 on picture] to the closing tag. - When you are done with writing your new navigation press Update Navigation button [number 6 on picture].
- You can see which files changed in console at the bottom of the Html Assistant window [number 7 on picture].
- That's it. All files from the project folder are now updated with the new navigation.
3. Menu bar

- New File
- Open Project
- Edit Templates
- Help
- About
Opens window where you are able to select predefined templates and create new html files in the current project folder.
Select the folder in which you would like to keep the navigation / footer / header consistent.
Opens a window, where you are able to create new, update or delete existing templates. Templates are used only when you are creating new html files via new file menu icon [number 1 in menu].
Opens documentation website in your default browser.
Displays all information about Html Assistant.
4. Contact
If you find any bug, please do not hesitate to create an issue on Github and I will try to fix it.
I hope you have as much fun using this software, as much as I had writing it. If you would like to share your story how this program helped you when creating website, feel free to contact me via my Website
5. Roadmap
- Redesigned icon - in 48x48 px, 128x128 px , 256x256 px